Working with Barcodes
To bring up the barcode properties, double-click on the barcode.

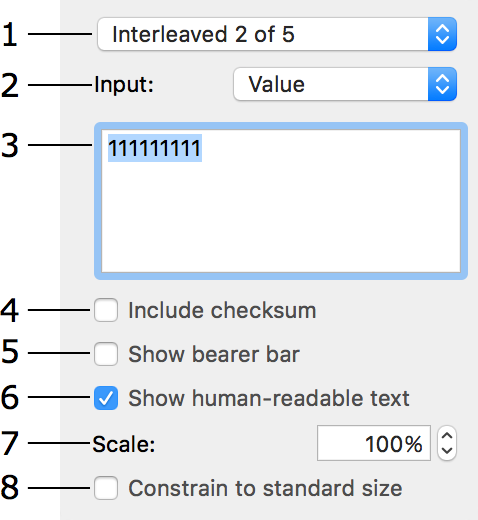
1 – Barcode type. When you change the barcode type, remember that not all barcodes support the same range of characters, which may leave part of your data unreadable.
2 – Data source. Three options are available.
Value lets you type or paste information directly into the edit box.
File lets you link the barcode to a text file. The import settings are described in Importing Data from a Text File.
Counter is a number that automatically increases or decreases according to a pattern. You can choose the initial value.
3 – The edit box where you can enter in information manually.
4 – An option to add the checksum to the barcode. Not all barcodes support this feature.
5 – Add a border to the barcode. Only the "Interleaved 2 of 5" barcode supports this feature.
6 – This option shows the encoded text or number along with the barcode.
7 – Barcode scale. Be careful, barcode scanners can have difficulties reading barcodes scaled smaller than 100%.
8 – Enable the Constrain to standard size option to resize the barcode to an easily readable size.
Any information entered manually remains the same no matter how many barcodes you print. Values imported from a text file or generated by the counter are dynamic, meaning that when you print multiple copies of your document, each copy can contain different information.
If inputting or importing data was followed by an error message, check to make sure that both the inputted characters and the amount of characters are supported by the chosen barcode type.